Contributing to respy#
Contributions are always welcome. Everything ranging from small extensions of the documentation to implementing new features of the model is appreciated. Of course, the bigger the change, the more it is recommended to reach out to us in advance for a discussion.
You can post an issue or use the email contact details underAbout us
Where to start?#
In general, you can take a look at our issue tracker or at our roadmap to find opportunities to contribute to the project.
If you are new to respy, you might want to check out issues labeled as good-first-issue.
Workflow#
Assuming you have settled on a contribution, fork the repository (only if you do not have write access to the repository). This will create a copy of the repository where you have write access. Your fix will be implemented in your copy. After that, you will start a pull request (PR) which means a proposal to merge your changes into the project.
Clone the repository to your disk. Set up the environment of the project with conda and the
environment.yml. Implement the fix.We validate contributions in three ways.
We have a test suite to check the implementation of respy.
We correct for stylistic errors in code and documentation using linters.
We test whether the documentation builds successfully.
You can run all checks with
toxby running$ toxThis will run the complete test suite. To run only a subset of the suite you can use the environments,
pytest,lintingandsphinx, with the-eflag of tox.Correct any errors displayed in the terminal.
To correct stylistic errors, you can also install the linters as a pre-commit with
$ pre-commit install
Then, all the linters are executed before each commit and the commit is aborted if one of the check fails. You can also manually run the linters with
$ pre-commit run -a
If the tests pass, push your changes to your repository. Go to the Github page of your fork. A banner will be displayed asking you whether you would like to create a PR. Follow the link and the instructions of the PR template. Fill out the PR form to inform everyone else on what you are trying to accomplish and how you did it.
The PR also starts a complete run of the test suite on a continuous integration server. The status of the tests is shown in the PR. Reiterate on your changes until the tests pass on the remote machine.
The main contributors will be automatically notified to review your changes. Include their remarks in your changes.
If the changes should be merged, add yourself to the list of contributors and depending on the size of the changes, add a note to
release_noters.rst. The final PR will be merged by one of the main contributors.
Guidelines for the documentation#
The documentation is written in reStructuredText or as a Jupyter notebook and rendered with Sphinx whose documentation also provides an introduction to reST.
Types of documents#
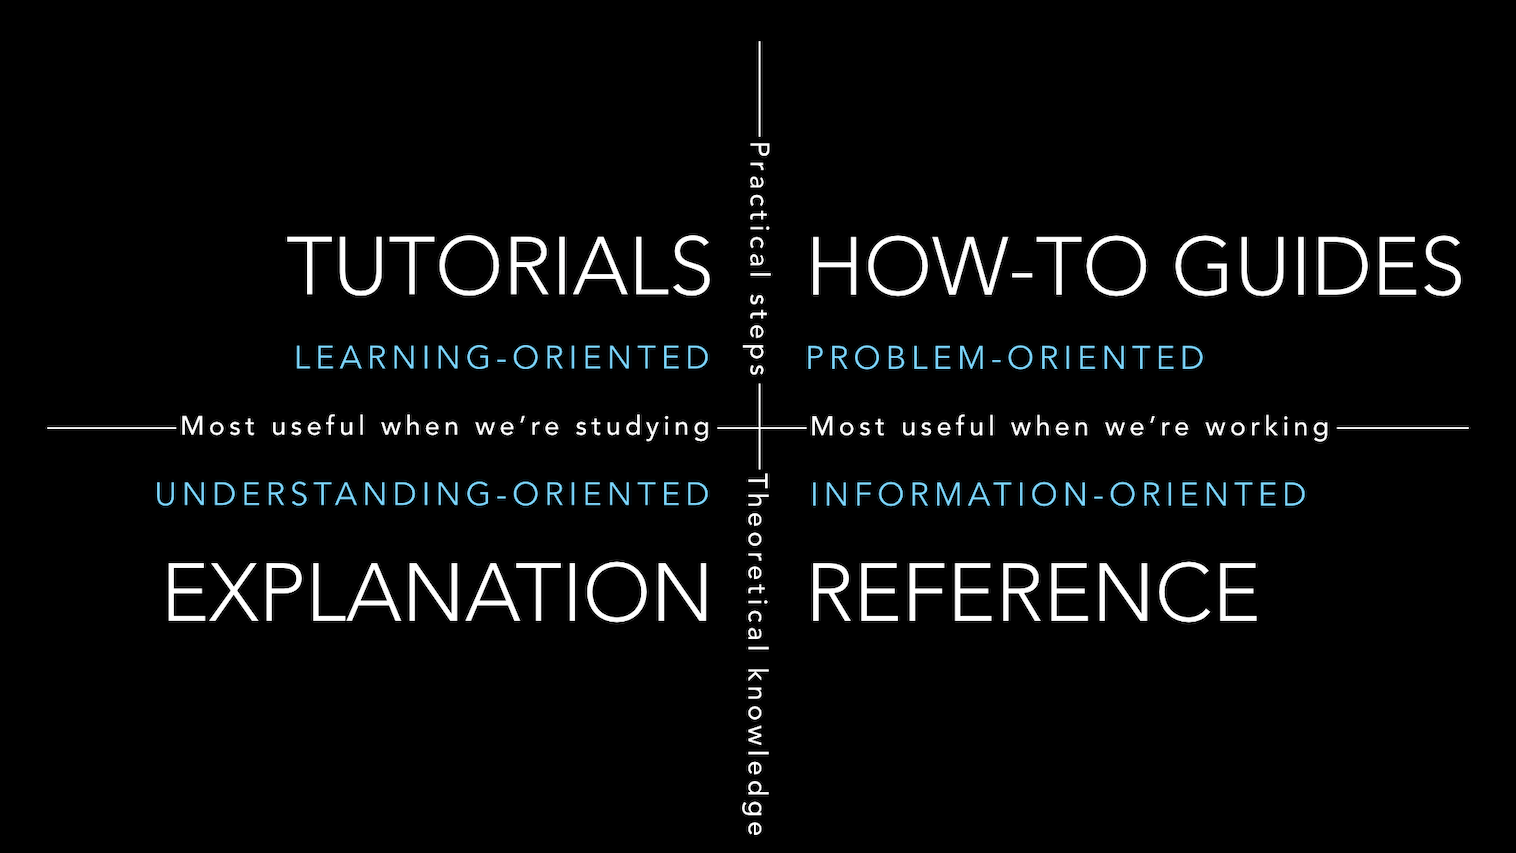
Tutorials, explanations, how-to guides, and reference guides are the cornerstones of the documentation and, thus, there are stronger requirements in place for a contribution. The structure is inspired by Daniele Procida who shared his approach in text and video. The main take-aways for each part are:
Tutorials are learning-oriented and should guide the user through a series of clearly defined steps with little fuss. Every step needs to produce a result to build the user’s self-confidence in using the software. Offer only the minimum necessary explanation. Provide some links to related explanations or how-to guides, but do overdo it and create confusion.
To tutorial templateHere is aTemplate for tutorials
Explanations are understanding-oriented. They provide context, discuss alternatives, but most importantly, nothing is done nor is the code discussed directly.
How-to guides are problem-oriented and offer a series of steps to achieve a specific result. They do not explain, they leave things out.
Reference guides are information-oriented and explain the implementation and should be read with the source code. They have preferably the same structure as the code.
The following figure shows how the sections relate to each other and that some have a natural proximity. Though, it is important to keep the separation in place for a well organized documentation.
Styleguide for the documentation#
In general, follow the style applied in other documents. This list can never be exhaustive, so pay attention to the rest of the documentation.
The correct code formatting in
.rstfiles is ensured byblacken-docs. To correctly format the code inside notebooks, use the jupyterlab-code-formatter with the black formatter.Use the following order of headings
===only below the main heading of a document.---~~~^^^"""
Between the end of a section and the following heading are two empty lines.
The documentation is formatted with a line length of 88 characters. To wrap the text use AutoWrap for Sublime Text, and this setting plus the fill-paragraph command with PyCharm.
For rather self-contained functions with few arguments, a doctest can serve as a unit test while providing documentation at the same time.
Cross-references which do not hurt the reading flow are highly recommended to prevent the same information spread over various parts of the documentation and to provide further insights.
We make use of the following HTML object to produce cross-references which stand out, but can be skipped quickly.
<div class="d-flex flex-row gs-torefguide">
    <span class="badge badge-info">To how-to guide</span>

    Find out more about numerical integration in <a
    href="../how_to_guides/numerical_integration.ipynb">How to
    improve numerical integration</a>.
</div>
with renders like
To how-to guideFind out more about numerical integration in How to improve numerical integration
Note that, the path is the same, but the file extension has to be changed to
.html.In notebooks, the HTML has to be placed in a separate cell which must not be a markdown but a raw cell in HTML format. The nbsphinx documentation explains this nicely.
In normal RST files, insert
.. raw:: html

   <div
    <p class="d-flex flex-row gs-torefguide">
        <span class="badge badge-info">To how-to guide</span></p>
    <p>Find out more about numerical integration in <a
       href="../how_to_guides/how_to_improve_numerical_integration.html">How
       to improve numerical integration</a> </p>
   </div>
Guidelines for docstrings#
Docstrings in respy are written in NumPy Docstring Standard. Here is an example.
Styleguide for docstrings#
The first line of a docstring starts is right after the three quotes.
Keep a newline between the last text of a docstring and the closing quotes.
Inline code is surrounded by single backticks, e.g.,
`sum`.Doctests are a preferred way to test and document at the same time.
Guidelines for the code base#
Styleguide for the code base#
Some styling issues are enforced by several linters and formatters which are run in accordance with the tests. The contributor can focus on details which cannot be automatically be enforced.
The first two are very important because they help to read the code almost like a normal text.
Good names for functions and variables
“You should name a variable using the same care with which you name a first-born child.”, Robert C. Martin, Clean Code: A Handbook of Agile Software Craftsmanship.
A bit more concretely, this means:
The length of a variable name should be proportional to its scope. In a list comprehension or short loop,
imight be an acceptable name for the running variable, but variables that are used at many different places should have descriptive names.The name of variables should reflect the content or meaning of the variable and not only the type.
Function names should contain a verb. Moreover, the length of a function name is typically inversely proportional to its scope. The public functions like
get_example_modelsandget_solve_funccan have very short names. At a lower level of abstraction you typically need more words to describe what a function does.Other recommendations can be found in PEP 8.
Intuitive code structures
We strive to use intuitive and efficient code structures. This may require you to revise your code contribution multiple times but will ensure that it is useful and comprehensible for all future users and contributors. See below for an example of an easy switch that can commonly be made.
# Bad
dict_names = []
for name in dictionary:
    dict_names.append(name)

# Good
dict_names = [name for name in dictionary]
The loop covers three lines which automatically produces visual noise and the code seems to carry some weight, although, almost nothing has been done.
The list comprehension hides the operation in a single line and I might be able to read the code while only looking at the variable name.
Other preferred syntaxes are
ternary operators or conditional expressions like
a = 1 if b > 2 else 4.